This week, we'll talk about one of the most fitting settings for a rectangular block - a subway style tiling. Just like those subway tiles you see in a home improvement store or on HGTV - rectangles!! This is the simplest way to set rectangular blocks. Check out
Rachel's Colorbrick Quilt to see a popular version of this setting!

For the simplest setting of subway blocks, just sew them together in rows. Find the centers of the blocks in one row and line them up with the seams of the next. Sew all the rows together.
Of course, we only have 9 blocks, so you can intersperse 7" x 14" rectangles of various fabrics.
We're going to look more at some variations of subway tiling.
First off, adding some "mortar" to the "tiles" will help add some quiet space for the eye. Second, there's no need to include full rows! I'll be showing you two options with lots of negative space. (But, if you like the looks of your blocks right against each other, no need to have either! Just include solid fabric blocks for the other "bricks".)
Lots of negative space is characteristic of many modern quilts. It gives the eye plenty of room to rest and encourages it to focus on certain areas. This works really well with our sampler blocks, since they are detailed and all different from each other. It keeps the projects from looking too busy. Even if you are using traditional fabrics for this project, negative space can still be beneficial.
First, we have a diamond setting which uses all 9 blocks:
 Sewing instructions:
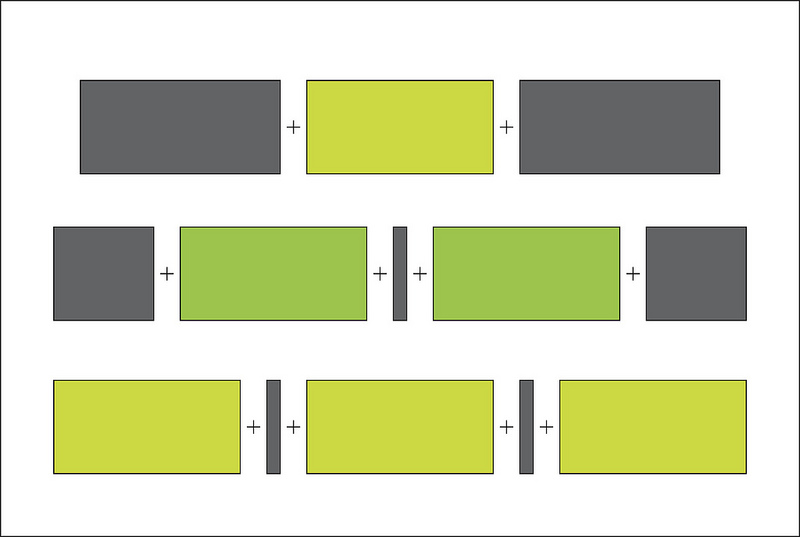
Step 1: 7.5" x 15.5" background fabric + block + 7.5" x 15.5" background fabric (make 2)
Step 2: 7.5" x 8" background fabric + block + 1.5" sashing + block + 7.5" x 8" background fabric (make 2)
Step 3: block + 1.5" sashing + block + 1.5" sashing + block (make 1)

Then sew 3" x 44.5" sashing between the columns (sashing will finish at 2.5" wide).

Lastly, add some fabric to the outside of the quilt center as shown in diagram to the left. To the left and right sides, add 8" x 44.5" pieces. Then add 8.5" x 60.5" pieces to the top and bottom.
Done! Finishes at 60" x 60".
Find the cutting diagram
here.
Next, we have an option which only uses 8 blocks. I think this one looks very modern.
Sewing instructions:Again, sew 1.5" x 7.5" sashing between the blocks and frame the single blocks with 7.5" x 8" background fabric.

Step 1: block + 1.5" sashing + block (make 3)
Step 2: 7.5" x 8" background fabric + block + 7.5" x 8" background fabrics (make 2)

Then sew 3" x 29.5" sashing between the columns (sashing will finish at 2.5" wide).

Lastly, add some fabric to the outside of the quilt center as shown in diagram to the left. To the left and right sides, add 8" x 29.5" pieces. Then add 16" x 60.5" pieces to the top and bottom.
Done! Finishes at 60" x 60".
Find the cutting diagram
here.
Of course, you can vary these settings greatly, I'm just giving you exact measurements for a jumping point or if you really like one of these options.
I've been enjoying seeing all of the blocks pop up in the
Flickr group and encourage you to voice any questions you might have. I'll be back here next week with some projects using fewer blocks.
 For the simplest setting of subway blocks, just sew them together in rows. Find the centers of the blocks in one row and line them up with the seams of the next. Sew all the rows together.
 Sewing instructions:
 Then sew 3" x 44.5" sashing between the columns (sashing will finish at 2.5" wide).


